
Most of the work of making tofu is actually making soy milk. The process of tofu-making is nearly identical to making simple cheese where you add a coagulant like lemon juice to warm milk so it separates into curds and whey, then strain out the liquid and press the solids together. You take dry soybeans, hydrate them in cool water, then blend them in hot water to get "milk." Then add a coagulant so it separates, and strain it and press the solids into tofu.
Before embarking on this mad, 100% from-scratch project, I made soy milk using a blender and a stock pot. To minimize the "beany" flavor, you have to keep the temperature within a certain range. It was doable, but frankly, kind of a pain, and I just wasn't able to get the flavor the way I liked it. Plus, it was really easy to scorch the heated soy milk, creating all sorts of unpleasant flavors, or have boilovers, creating a ghastly mess. So I saved up and got a SoyaPlus beverage maker that can make milk out of any bean, nut, grain or seed. Using this appliance makes soy milk production infinitely easier, and because the machine is able to heat the water and blend at specific temperatures, it makes much less beany milk.

To make a batch of soy milk, I scoop out one measure of soybeans the night before, using their measuring cup, and soak them in cold water. You can just add dry beans to water and process, but you'll get much better yield if you soak them for at least four hours. The beans will swell and become lighter in color. In the morning, I pour off the soaking liquid, put the beans in the reservoir, add water to the fill line, lock the top half with the blender device to the reservoir, plug it in and press the button on top that corresponds to what I'm making into milk: Beans +, Soy beans, Soy +, Rice +. The machine heats up the water, blends, waits, blends some more, waits some more, and eventually starts beeping to let you know when it's done. I pour the contents through their enclosed fine metal sieve to strain out the soy milk solids (okara) into a heat-safe receptacle to cool (NOT their plastic pitcher, because adding hot liquid to plastic will leach out nasties). Easiest non-dairy milk you ever made.
To make tofu, it's a little more trouble, because you have to make four batches of milk. So this takes a bit of time, although largely unsupervised.
Once I've made four batches of soy milk, the rest is blissfully easy. I acquired a Soyajoy Total Tofu Kit, which consists of a wooden tofu press, 1 lb of nigari to coagulate the soy milk, and a cotton cloth to line the mold.
Nigari is basically the various minerals left over after salt is removed from sea water.
Here's the process:
Heat the soy milk in a pot to a gentle simmer for 5-10 minutes, then cool to 170-180 degrees. Dissolve 1 tsp of nigari in a cup of warm water. Pour 3/4 of this solution into the soy milk and stir. Wait three minutes. The liquid will separate into tiny white curds and a yellowish whey. If you see any milkiness to the liquid, add the rest of the nigari solution. If you like harder tofu, add the rest of the solution. Less coagulant produces softer tofu, and more makes harder tofu.
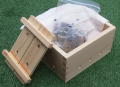
The tofu press consists of a wooden rectangle, a bottom plate with supports that stick out past the edges of the box (IMPORTANT: don't confuse this with the top plate or you'll have a mess on your hands), and a top plate that fits inside the main box and slides down inside. Put the bottom plate on a plate in the sink, or inside a plastic basin on the counter. Set the main box on top, lay the draining cloth inside, making sure all sides are covered, and ladle in the contents of the pot. Liquid will start draining out, leaving the tofu solids behind. When enough of the liquid has drained out, pour the rest of the contents of the pot into the press, put on the top plate, and find something that weighs about 3-5 lbs that fits on the plate to weigh it down.
Let it drain for 20 minutes, then gently put the block of tofu you've just made into a container of cold water and let it sit for another hour. Then you can use it in cooking, or store it in the refrigerator until you are ready, making sure to change the soaking water every day.
Let it drain for 20 minutes, then gently put the block of tofu you've just made into a container of cold water and let it sit for another hour. Then you can use it in cooking, or store it in the refrigerator until you are ready, making sure to change the soaking water every day.
Salt-and-pepper Tofu Stir-Fry

Ingredients:
- One block of homemade tofu
- 1 cup uncooked brown rice
- Bok choy (1 large, or 6-8 baby bok choy)
- Yellow squash (2-4)
- Garlic (to taste)
- Fresh ginger, peeled and minced (to taste)
- 1 tbsp sesame oil
- 1 tsp salt
- 1-3 tsp black pepper
- Cornstarch (about a half-cup)
Rinse the brown rice in a sieve, shake off the excess water, put into a pot with a tight-fitting lid, and add 1 3/4 cups water. Some brown rice packages now say to use 2 cups of water instead of 1 3/4, but this yields what I feel is mushy brown rice, and where the structure of the rice grain breaks down into an "exploded" texture. I like my brown rice fully cooked, but chewy and toothsome, with each grain intact. However, many people like softer brown rice, and use two cups. You are the best judge of what you like to eat. Bring to a boil, turn down to low, and simmer for 45 minutes. If you have a rice maker, make brown rice according to its instructions.
When the rice is done, begin the rest of the preparation. This stir-fry will cook fast and needs to be eaten very soon after it's finished cooking, for the best possible texture. If you have misjudged the timing, you will end up with soggy squash and flaccid tofu.
When the rice is done, begin the rest of the preparation. This stir-fry will cook fast and needs to be eaten very soon after it's finished cooking, for the best possible texture. If you have misjudged the timing, you will end up with soggy squash and flaccid tofu.
Cut the yellow squash on the bias (at an angle), yielding thin, oblong slices. Chop the bok choy. Get your oil ready. Rice bran oil has a higher smoke point, so you can get it hotter than other oils, and with stir-fry, the hotter the better.
Add a splash of oil to your pan, heat as high as you can, toss in sliced garlic (as much as you like, according to your taste), and cook briefly, just until it has taken on a light touch of color. This can take as little as 10 seconds if the heat is up as high as it should be. If it burns, throw it out, wipe out the pan and start again. Remove garlic with slotted spoon and reserve.
Add a splash of oil to your pan, heat as high as you can, toss in sliced garlic (as much as you like, according to your taste), and cook briefly, just until it has taken on a light touch of color. This can take as little as 10 seconds if the heat is up as high as it should be. If it burns, throw it out, wipe out the pan and start again. Remove garlic with slotted spoon and reserve.
Add minced fresh ginger, cook for 10-20 seconds, scoop it out and add to reserved garlic if you like, or discard if you don't like the texture in your food.
Add the squash and bok choy and cook quickly, tossing and stirring constantly. Home kitchens cannot replicate the high heat of a commercial stove and produce a truly fine stir-fry that drives off moisture in a flash and creates a smoky sear in seconds, but we do what we can. A good stove over high heat can still make a great stir-fry. High heat, quick cooking, constant movement of the pan. This should only take a minute or two. Stir, toss, keep that pan moving. Do not walk away from the stove under any circumstances or lose your focus. It's just you and the stove for the next few minutes.
The squash will pick up a bit of brownness, and soften just a bit. Don't overcook it. You want it a little less done here than you'd like. It's going to sit for a moment while you do the tofu, continuing to cook in the residual heat. Drizzle it with sesame oil, add back in the sliced garlic (and ginger, if you like), turn out into a bowl, and toss.
Take your homemade tofu and dry the surface well, then cut into cubes. In a large bowl, add 1/2 cup of cornstarch and at least a teaspoon of salt and pepper. This coating will be thin, crispy and very flavorful, so you need to use ample seasoning. Toss the cubed tofu with the seasoned cornstarch.
Add about a half-cup of oil to the wok or pot and let it heat up. Fry the tofu in two batches until the coating is crispy and browned in places. On my stove, this takes anywhere from 3-5 minutes per batch. Remove with a strainer, slotted spoon or spider, and put onto a plate. You don't need to line it with paper towels. When the second half of the tofu is cooking, get ready to serve. When it's done, put rice on each plate, spoon the vegetables alongside or on top, and add the crispy tofu. Alternatively, you can serve it family style, with the rice and vegetables together if you like, but serve the tofu on its own platter. If you combine the crispy tofu with the other two on a serving platter, the moisture will quickly soften that delicious crisp coating you've worked so hard to create before you're able to pop a cube in your mouth.
Serve with soy sauce, but bear in mind that the salt-and-pepper tofu will have plenty of salt, and when eaten in combination with the other components, adding too much soy to the rice or vegetables may be overpowering.


No comments:
Post a Comment